Goat Cheese and Honey Appetizer
Last August my husband and I went to Amsterdam and Germany for our anniversary. We rented an adorable little flat in Amsterdam in the Di Pijp neighborhood. We thought we would save a few euros by cooking our own meals from time to time. Our first evening we went out to dinner but the second night we went to the corner grocery store and bought stuff for dinner at the flat. This was the first and last time we went shopping without the Dutch phrase book. I won’t go into details but I will say it took us 10 minutes of examining the vegetable spread and butter case to figure out which one was the Butter. The easiest thing to figure out was the goat cheese. Ok, the crackers were the easiest. I decided to make an appetizer.
This is so easy that I’m not going to make you a printable version. This could be an appetizer, a dessert or a snack while playing Sims and watching Futurama. For example.
 1. I wanted to use chopped walnuts but I couldn’t find any. I swear it wasn’t the language barrier, I know walnuts when I see them. Instead of walnuts, I found some mixed nuts and raisins. This actually was a nice variation. Just grab a handful and chop them up a bit.
2. Goat cheese packaging seems to be universal. At least between the US and Holland. Slice the cheese into 1/2 inch pieces right in the package. You could take the whole thing out, I suppose, but this is less messy.
3. Arrange two pieces onto a small plate. (Note the goat cheese packaging. I don’t know why but I think it’s adorable.)
4. There was honey in the cupboard which is where I got the idea in the first place. Drizzle a bit over the goat cheese. Honey is yummy.
5. Sprinkle the chopped nuts and raisins over the whole thing.
That’s it!
Add a little wine and crackers and you’re set!
Chik’n Bowl
If you don’t like Thanksgiving-type food all mixed together, you’re probably not going to like this one.
However.
If you, like my husband, like to mix your corn and mashed potatoes together, keep reading.
Furthermore.
If you, also like my husband, like those KFC Bowl things but, like me, KFC gives your digestive tract a not nice time, keep reading.
I made this up a couple weeks ago. It was the day before pay day so our rations were getting pretty slim. Scouring the cupboards and freezer, I starting thinking aloud, “Let’s see…we’ve got rice, barley, mashed potatoes…corn and (quick count) 10 chik’n nuggets. We could do mashed potatoes and corn, the kids could have the chik’n nuggets…OH!! What if I mixed it all up like those KFC bowl things that you like?” Matt’s face lit up and I got to work.
15 minutes later, the family was eating. 10 minutes after that I was sad there wasn’t enough left-over for me to have seconds.
This is soooooo easy that I’m not even going to do a step-by-step for you. It does call for all sorts of convenience foods like instant mashed potatoes and frozen corn but that’s the point of this recipe: Quick, easy, and tasty! If you have a bunch of homemade mashed potatoes in your fridge or freezer and fresh corn from your garden, by all means use them, just don’t go through a lot of trouble making a bunch of stuff from scratch. If you’ve got some gravy left over from some other meal, throw that in there, too. Go with your heart.
One last thing about this one: be sure to eat it right away, unless you don’t mind mushy chik’n nuggets. I do mind mushy chik’n nuggets so I scarf that sucker down.
Recipe: Chik’n Bowl Print Version
On a sort of related note: here’s the harvest Matt brought in from our (his) backyard garden:
Not shown: Chives. You better believe those went into the potatoes.
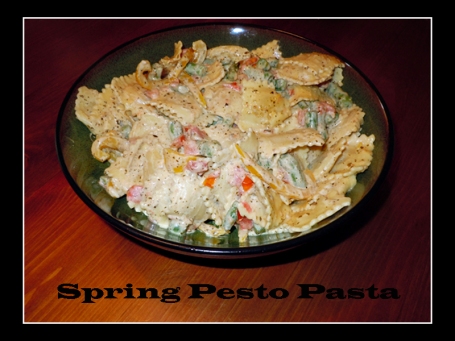
Spring Pesto Pasta
Pasta is a staple in most people’s diets, particularly vegetarians. Most vegetarian options at restaurants are pasta based and are usually some version of Fettuccine Alfredo, with broccoli if you’re lucky. I am not here to discuss the evils of carbs and pasta (or alfredo sauce).
I LOVE PASTA.
When I first went vegetarian, my family ate a LOT of pasta. And cheese but we’ll cover cheese in a future post. As I’ve gotten more comfortable trying new recipes, I have cut back on the pasta I prepare. However, we still eat about 2 pasta meals a week.
WE LOVE PASTA.
Not knowing what the heck I was doing in those early vegetarian days, I had borrowed a few vegetarian cookbooks from a friend. The recipe I’m presenting to you today is one of the first dishes I made and it came from an old Betty Crocker “Easy Vegetarian” magazine that was published in March 2000. (Unrelated: Wow, it feels weird to type out 2000 as a year.). The title of this blog is “Cooking New Classics” and this dish really has become a New Classic in our house. My husband requests it at least once a month. It’s extremely versatile: omnivores can add chicken or use meat-filled ravioli, you can put in some fake chik’n (I was going to this time but totally forgot), you can change up the vegetables and it also works just as easily with tortellini if your grocer is out of ravioli. OH! I forgot the most important part: IT’S SO FRICKEN EASY! AND FAST!
First up! The Ingredients
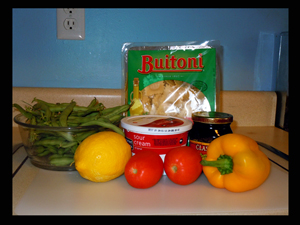
Green Beans: these are from our garden. I use the term “our” loosely, Matt does all the work. In the winter time, or when the garden hasn’t yielded any beans yet, I use frozen Cut Green Beans. I’m lazy so if I can find short-cuts, I’m going to take them. Unless I’m in the mood to cut veggies, which actually happens more often than I give myself credit for. Lemon: this is actually the first time I’ve ever used a lemon in this dish. Someone finally forked over the $3.89 and got herself a citrus zester. That would be me. I am more excited about this zester than is probably normal. Imagine all the recipes that will now be all “ZING!” simply because I have this nifty little tool. Roma Tomatoes and Yellow Pepper: Remember in the Deep Fried Tofu post when I said I cook plenty of things that I don’t like but Matt does? These are two of the three biggies (the third one is Onion.). I do eat a few pieces of tomato and pepper in this dish, but Matt ends up with the lion’s share. He never complains. Sour Cream: People, people, people. DO NOT USE FAT-FREE SOUR CREAM. If you are going to use sour cream, jump in. You’re really not inhaling that much so just do yourself a favor and go with the full-fat tub. Low-fat is ok, I guess, but why do that to yourself? Basil Pesto: You could make your own from scratch but I repeat: why do that to yourself? Ravioli: I love you, Ravioli. MWAH!
I didn’t photograph the “cooking pasta” part because, “WHOA! A pot of water!”. Just pretend there are pictures demonstrating that you cook the pasta according to the package here. While the water is heating to a boil, cut up your veggies and start cooking them. Don’t forget to add the pasta to the boiling water or you’re going to miss a key part of the Spring Pesto Pasta dish.
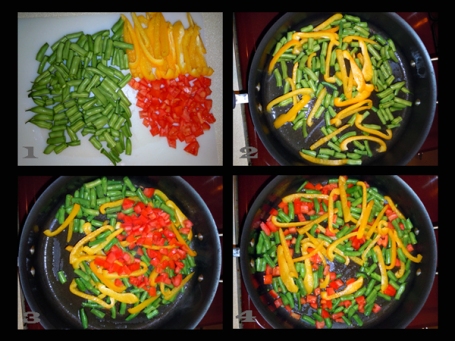
1. Cut up the green beans (washed of course. These came in straight from the garden and were very dirty.) into one inch pieces. You could dice up the peppers, as I always did in the past, but I think I like the strips better. Adds a nice dimension to the meal. It took me years to perfect the Tomato Cutting Method: cut the tomato in half length-wise. Cut those halves in half length-wise. Scrape out the seeds with the end of your knife (or your finger if you like the feel of slimy tomato guts.). Cut all the quarters into strips, then dice them up. Yes, it took me years to perfect that. I’m laying it out here so those of you who, like me, are too afraid of looking stupid to ask, will never have to. (wait ’til I show you how to cut an onion. It’ll blow your mind. (actually, PW taught me and she can teach you, too!))
2. Heat up a tablespoon or two of olive oil in your favorite skillet. Saute the green beans and peppers until “tender-crisp”, about 5-7 minutes. If you like your veggies softer, just cook ’em longer. You really can’t mess up peppers and green beans. Note: If you do use frozen green beans, cook those for a few minutes before adding the peppers to thaw them out a little.
3. Toss in the tomatoes and saute for another five minutes.
4. I gotta say, as much as I don’t like peppers and tomatoes, they sure do look pretty all mixed up with those beans, don’t they? And see what I mean about the pepper strips? Instead of a pan full of square vegetables, we got some different shapes livening things up a bit. Embrace diversity in all aspects of your life, my friend.
After the veggies are done, remove them from the heat and set them aside for now.
1. Ok, remember when I said don’t forget about adding the pasta to the water? I didn’t forget (although the first time I made this, the timing was all off and things didn’t come together at the same time.) and here’s the proof.
2. In a small bowl, add a little over 1/2 a cup of sour cream, 3 tablespoons of the basil pesto sauce (put the rest in the fridge to use another day for something else. It’s really good spread on crescent roll dough and then rolled up and baked.), and THEN!!! Take out your Super Awesome Incredibly Not As Expensive As You Thought It Would Be Citrus Zester and then kick yourself for waiting this long to get one. Score it along the peel of the lemon and little strips of the peel will fall right onto your cutting board. And THAT is Lemon Zest. Add it to the sour cream and pesto and feel all kinds of fancy and gourmet.
3. Mix it up. Feel free to add more sour cream or pesto. The mixture will be a little thick, don’t worry. It will all work out.
4. Drain the pasta and put it back into the pot. Add the veggies and creamy pesto. Stir it up with a dash or two of salt and pepper. Serve it right out of the pot, OR, to continue with the fancy feeling left over from the Lemon Zesting you just did, put it all into a serving dish. (I like to put the serving dish in the oven set to “warm” while I’m making the sauce and mixing everything together. Keeps the pasta warm.)
I cannot convey how good this is. It’s a guaranteed “Kid Friendly” and “Second Helping” meal. Go forth! Try it!
Printable Version: Spring Pesto Pasta Print Version
Deep Fried Tofu with Thai Red Curry Sauce
We have a rule in the house: I make it, you eat it. Of course I never make a meal twice if someone absolutely can’t stand it. Well, that’s not true. My kids are 5 and almost 2. I can’t really trust their opinion. If my husband absolutely can’t stand it I won’t make it again, usually because the rest of the family hates it, too. I also cook plenty of things he likes and I don’t like. Peppers and onions come to mind. I figure we can always pick things out.
My husband doesn’t like tofu.
It’s a little hard to pick that out. Well, ok, it’s not hard to pick it out because I always cook it up in bite-size squares. What I meant was one probably shouldn’t eat around the protein part of one’s meal. My husband knows this and so he eats the tofu. I’ve tried numerous ways to make it more appetizing to him and he’s conceded that the flavor I put into it is fine. It’s the texture that bothers him. A fairly common statement, really, and one I can understand.
Yesterday on the drive home (we carpool most days) he told me that a friend suggested flouring and frying the tofu. Being me, I had a lot of questions:
- Do you still press it?
- Do you dip it in an egg wash first?
- If not, how does the flour stick if you’ve pressed most of the liquid out?
- Do you fry up large pieces of it then cut it up?
- Do you dip and fry each bite size piece?
I tend to over-think things. My husband took out his handy dandy G1 and researched “Deep Frying Tofu”. As I was planning on doing a tofu stir-fry that night anyway, I figured, “why not try it tonight?” So we borrowed a metal slotted scoop/flipper thing from my Mother-In-Law and Matt made the kids banana pancakes (I knew this would take awhile and didn’t want them waiting for dinner) while I tackled the tofu.
1. Drain a container of Extra Firm Tofu. Using my ultra-professional method of placing the block of tofu between several napkins and balancing a bottle of dishwasher soap on top of it (and realizing now that I usually put a plate on top of the tofu and the soap on top of the plate. Which would explain why the block was so lop-sided when I took it off.), I pressed most of the liquid out. This is an important step anytime you cook with firm tofu. It helps with the texture and cooking.
2. While the soap bottle did its thing, I prepared the batter: 1 Tablespoon corn starch, 1 cup whole wheat flour, olive oil (for frying, actually, not the batter.),1 egg, 1/4 teaspoon baking powder and 2/3 cup water.
3. Place all the ingredients into a small-medium size bowl
4. Mix it all up thoroughly.
I’ll admit, I was a little dubious at this point. The batter seemed really thick. But, what did I know? I’d never deep fried anything before. So, I poured a bunch of olive oil in a hot wok and let it heat up while I moved on to the tofu. OH! there should be enough oil in the wok so it covers the bottom half of the tofu pieces. I’m sorry, I don’t measure eye-balling well.
5. Grabbing an obscenely large knife, I sliced the block in half down the middle (not shown but pretend my knife is moving straight ahead from where it’s laying.)
6. Cut strips approximately 1 inch wide.
7. Turn the block around and cut 1 inch cubes.
8. Spread them out around the cutting board and sprinkle some salt over them. I couldn’t actually tell if any salt was coming out of the shaker so I had to inspect the tofu to see if any had landed. Not the easiest thing, looking for white specks on nearly white food. I thought I saw some and called it, “Salted.”
Now the fun part! And by “fun” I mean “hot and tedious”. It wasn’t that hot outside so we’d turned the a/c off (mostly because I’d looked at our electric bill the day before and nearly soiled myself.) and of course I thought this was the perfect time to stand over some freaking hot oil and deep fry 30 pieces of tofu.
Yes, I ended up taking my shirt off and yes, I ended up getting hot oil splattered on my stomach. It was probably the least sexy cooking scene where the cook is wearing nothing but a skirt and bra ever.
Ahem. Moving on.
9. Drop the tofu into the batter. Using a fork, spoon (can you spoon with a fork?) some batter over it until it’s covered. Scoop it out with the fork and gently tap the fork against the rim of the bowl to shake off excess batter. I sometimes used the non-serated side of a butter-knife (or what I call a butter knife. I guess they’re actually Dinner Knives, huh?) to scrape of the more stubborn batter.
10. Gently plop it into the hot oil. It took a couple rounds but I eventually got a system going: batter, plop, batter, plop, batter, plop, flip, batter, plop, flip, batter, plop, flip and so on. I’m pretty sure that only made sense in my head. Basically, by the time I had six in the oil, the first three were ready to be flipped around. When they’re nice and golden, scoop them out with a metal slotted spoon and place on some paper towels to drain.
11. Eventually there wasn’t enough batter to cover the pieces. And maybe I was running out of patience, but mostly it was the running out of batter thing. At any rate, I just threw the last 13 pieces into the oil, fried it up and added it to the breaded stuff.
12. Don’t they look nice? I was really impressed with how they turned out.
I was even more impressed when I poured the hot oil into an empty diced tomato can (saving a tablespoon or so for the rest of the stir fry) and it started sizzling like crazy because 50% of the time I forget to rinse out the can so all the tomato bits at the bottom of the can fried. It was awesome and I giggled a lot. “Matt! Do you hear that? That’s the hot oil in the tomato can! HAHAHAHA!” Maybe impressed isn’t the right word. Easily Amused. Only that’s two words.
Now what the heck do we do with all that deep-fried tofu?
13. Grab a bottle of Thai Red Curry Sauce and a bag of frozen veggies, of course! Look, I love washing and cutting vegetables as much as the next gal, but after all that frying, I went the easy route. (FULL DISCLOSURE: I usually go the easy route when it comes to stir fry.)
14. Ok, fine, I’ll throw in some peas from our garden. Happy? Cook and stir that for awhile until the veggies are no longer frozen and are, y’know, cooked.
15. Add the tofu and stir it up.
16. Pour the whole bottle (roughly 1 1/2 cups. I only know that because that’s what the original recipe said.) of sauce and stir and cook until the sauce is bubbly. Or “simmering” if you want to get all technical.
Cook up some rice, or use the rest of the super large batch you made a couple nights before, and spoon some of this on top. Voila!
Verdict: We both loved it! YAY! The texture was great and the sauce was spicey but not too spicey. The tofu could easily be used in many “chinese restaurant” meals like Sweet and Sour Tofu or Sesame Tofu, etc. Next time, I’ll cook it on a weekend when I have more time and when it’s not so hot out.
Or just turn the damn a/c on.
Printable Version if you want to try it: Deep Fried Tofu with Red Thai Curry Sauce.
Inspired by: Deep Fried Tofu and Thai Curry Rice Bowl .


