Jonas’ Elmo Cake
August 7, 2010 at 11:50 pm 1 comment
I don’t particularly love cake. I like cake, I have nothing against cake. Particularly if the cake is chocolate with chocolate filling and chocolate frosting. If it’s not that, then I’ll probably stick with ice cream.
But that’s what’s awesome about cake! Cake is versatile and it doesn’t discriminate against any dietary choice. There’s gluten-free, low-sugar, vegan, hidden-veggie, and good ol’ fat and sugar-laden cake. Vanilla, chocolate, carrot, strawberry, marble, blueberry, spice, coffee, and on and on. There is a cake for everyone. Plus it’s fun to say. Next time you’re having a crummy day, just say to yourself, “Cake” and you’ll feel a little better. Of course, then you’ll have to go out and find a slice of your favorite cake or else you’re going to feel more crummy than you did before you went and put the idea of cake in your head. What’d you do that for?
While I can generally pass on cake, I have a lot of fun decorating them. Or at least I assumed I would prior to decorating my son’s 2nd birthday cake. In the past, all I’ve ever decorated were cupcakes. I figured since I liked decorating cupcakes so much, why not take the leap to cake cake. And what better cake to plunge into full-fledged cake decorating than one for a small, family-only birthday celebration for my baby?
I cannot stress this enough: THIS WAS MY FIRST STAB AT CAKE DECORATING. I had no idea what I was doing. In fact, I think I’d only ever frosted a cake once or twice when I was, like, 10. I generally stick with glazes because there’s no exact science to it. (Also: see above chocolate with chocolate frosting love.) All this to say, please don’t judge my methods too harshly. As messy as things are in the pics, know that everything out of the camera shot were, like, 5 times as worse.
When I had my daughter, I made a vow to not give my hard earned dollars to licensed character party crap. I wanted to think we were more creative than that. Well, then this year came along, also known as The Summer That Was Incredibly Busy With Every Weekend Booked or Used to Plan or Prepare for Something Some Other Weekend. My daughter got a Powerpuff Girl themed party and my son got Elmo.
Baby loves Elmo. He also love balls and circles and ovals and really anything round. Combining these two loves, I Googled “elmo cake” and found all kinds of tips. One that popped up a few times was using a tooth pick to trace an outline onto a cake and decorating from there.
Here’s my take on it.
(I baked the cakes the night before and stored them in the freezer because my mother-in-law said they’re easier to frost. Also, I decorated the cake at night after the kids were in bed so the pics may be a little darker than usual.)
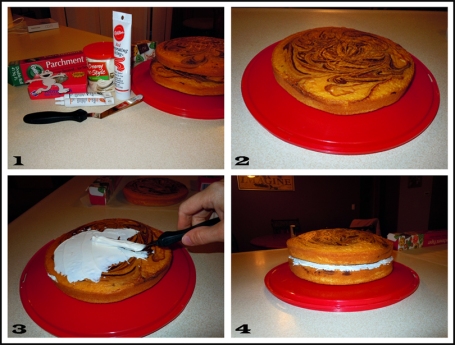
1. Supplies: Parchment paper, vanilla frosting, red decorating frosting, two frozen 9 inch round cakes, frosting spreader, orange and black decorating gel, box of tooth picks and my Elmo cut-out (not shown: decorating tips. I found a 4-pack of Wilton tips in the baking aisle of Target for $2.). I found this with a quick Google search for “Elmo coloring pages”. A note on the cakes and frosting: I would’ve made them both from scratch but the whole point was to keep this simple for me. So I went with a mix and pre-made frosting, don’t be hatin’. I wanted chocolate cake (duh) but the stupid store was out of chocolate in the brand I prefer so my daughter picked out marble. Another first: I’d never made a marble cake. I was afraid of messing it up. Yes, I know, it’s impossible to mess up a marble cake. That’s kinda the point of a marble cake. But, see, I’m nuts. I need everything to be even, including supposedly random things. What if the marble wasn’t…marbly enough? I let it go after spending more time than was warranted swirling the batter. (Spoiler: the cake was just fine.)
2. Place one cake in the center of a cake stand or cake carrier, whatever you want to serve it on. I used my beautiful new red cake carrier my afore-mentioned mother-in-law got me because she was tired of me always asking to borrow hers. My take away: if I keep borrowing stuff from people, eventually, they’ll buy me my own. Now, who wants to lend me their light blue Kitchenaid Mixer?
3. Frost the top of the cake. As you can see, I didn’t really know how to begin so I just sort of slapped some frosting on it and spread it around. You can also see the parchment paper in the background, laid out for the mess that was about to ensue.
4. Place the other cake on top. Take a good look at that clean read base. Things are about to get real.
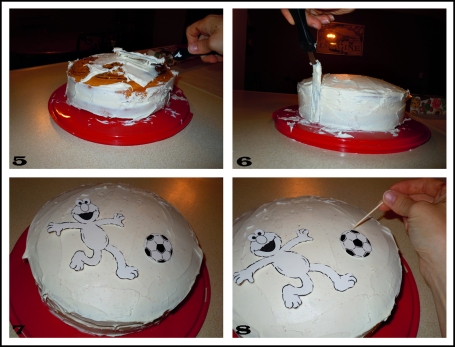
5-6. Um, yeah. I stuck with my “slap it on there and spread it around” technique. It got the job done but I honestly don’t know how frosting got all over the base and the surrounding counter (not shown) or on my arms (not shown). After I smoothed it as best I could (I just had an epiphany: buy a SECOND spreader so I can slap the frosting on with one, then smooth it out with the second clean one. I may have had better results.) I grabbed a clean cloth napkin and wiped all the frosting off the base, counter and then washed my hands and arms.
7. Place the cut-outs on the cake where you want the finished design to be. Generally speaking, this will be the middle of the cake but, y’know, whatever floats your boat, I guess.
8. Grab a tooth pick and start tracing along the cut-outs. You’ll need several of these. Just throw the used ones on your parchment paper and grab a clean one as needed. While you’re tracing, you’ll find out exactly how un-even all your frosting slapping was. Breath and let it go.
Now comes the fun part!
9. Using the tip of a clean tooth pick, lift up an edge of the cut-out and gently peel it away. Ok, yes, I should have traced the cut-out onto wax paper, cut that out, and used that instead because the frosting and the paper got a bit too friendly but hind-sight is 20/20, Mr./Ms. Know-It0 All. At any rate, I could see the outline so it didn’t matter.
10. This is where I realized, “Oh, right…outline only.” and had to rely on my less-than-stellar drawing skills to fill in the soccer ball. It was not easy as the tip of the gel wasn’t exactly “fine tip”. I figured as long as it was at least reminiscent of a soccer ball, Jonas would recognize it and I will have won that little drawing challenge.
11. Again, drawing the eyes and nose proved a tad difficult due to the wider tip. Plus, Elmo’s nose was a little top-heavy as gel doesn’t like to stay in one spot and started working its way down the curve of the cake. The red frosting was great because I had a round tip to screw onto the tube. It worked perfectly and I decided then and there that I didn’t care how little of the frosting I needed, I wouldn’t use gel for decorating purposes ever again.
12. After the out-line was finished, I grabbed the black gel (it was what I had! I had to ignore the vow I’d made 30 seconds prior and go with it.) and drew in Elmo’s mouth. Then, I switched out the round tip for the star tip and started filling in the body. You’ll note that there is nothing star-like about the frosting. I gave up trying to place individual stars after the third “star”. I still did individual stars, but didn’t freak out that they didn’t look like stars. It was better, in fact, because Elmo looked nice and furry.
13. Cleaning off the star tip, I drew a border along the bottom and then the top. It still needed…something. Knowing my son’s love for ovals (“obals”) I drew a few of them around the cake. I then wrote “Happy Day Jonas” because there was no room for the full “birthday”.
14. And there it was. I’ll admit, I was a bit proud that Elmo ended up actually looking like Elmo. He wasn’t perfect and neither was the soccer ball (not by a long shot) but I figured as long as Jonas knew what they were supposed to be, then it was a job well done.
Did he?
The following evening, the family came over for the celebration and I lifted Jonas up to see his cake. He pointed and exclaimed happily,
“E’MO! BALLY!”
Job well done, indeed.
EDITED TO ADD THE VIDEO JESS ALLUDED TO IN THE COMMENTS
I think I’ll be decorating cakes again.
Here’s a print version of the directions if you want to try it: Jonas’ Elmo Cake
Entry filed under: Decorating, Dessert. Tags: Cake.
Chik’n Bowl Goat Cheese and Honey Appetizer
1 Comment Add your own
Leave a comment Cancel reply
Trackback this post | Subscribe to the comments via RSS Feed


1. Jess | August 9, 2010 at 8:49 am
I think it turned out great! You should post the pic of you guys singing happy birthday, and him spitting on the cake. Way too cute. Happy birthday, Jonas!!!